Spring Boot
Learn how to leverage the Permit API and SDK to seamlessly integrate robust access control into your Spring Boot application. This step-by-step guide walks you through setting up your environment, creating policies with the Permit CLI with minimal code and maximum flexibility.
In this guide, we will quickly go through the steps to integrate Permit.io with Spring Boot. We will use Permit's CLI to create a new environment and a policy with a template. Then, we will use the Permit SDK to integrate it with our Spring Boot application. We will also set up the PDP (Policy Decision Point) server locally using Docker.
Prerequisites
- Spring Boot application
- Docker (for running the PDP server)
- Node.js (for installing and running the Permit CLI)
- Permit.io account (Follow this guide to create an account)
Installing the Permit CLI
We will first install the Permit CLI. Permit CLI is a command-line tool that allows you to create policies, run the PDP server, and perform other tasks. To install the CLI, execute the command below in your terminal.
npm install -g @permitio/cli
Once the installation is complete, execute permit to confirm the installation.
Authenticating the CLI
To use the CLI, we need to authenticate it with our Permit account. To authenticate, execute
permit login
This will open a browser window and ask you to log in with your Permit account. After logging in, the CLI will be authenticated and ready to use. This will also log you into the default environment (a project can have multiple environments). We can change the environment by executing permit env select and then selecting the environment we want to use.
Creating a policy with a template
Now, let's create a policy with a template. The benefit of using a template is that we can create a policy with predefined roles and resources using best practices. This will save us time and effort in creating a policy from scratch. To check the available templates, execute permit template list. Based on our needs, we can apply the template to a new policy by executing permit template apply --template <template-name>.
We will be using the blog-rbac template to create a new policy. This template is great for a blog application. It has a Viewer role that can view the blog posts and a Editor role that can edit the blog posts. It also has a Post resource that represents a blog post.....
To apply the template, execute the command below.
permit template apply --template blog-rbac
This will create a new policy with the blog-rbac template
Accessing the policy
Now, let's visit the Permit dashboard to check the created policy and also get the API key that we will use to authenticate our application when using the Permit SDK.
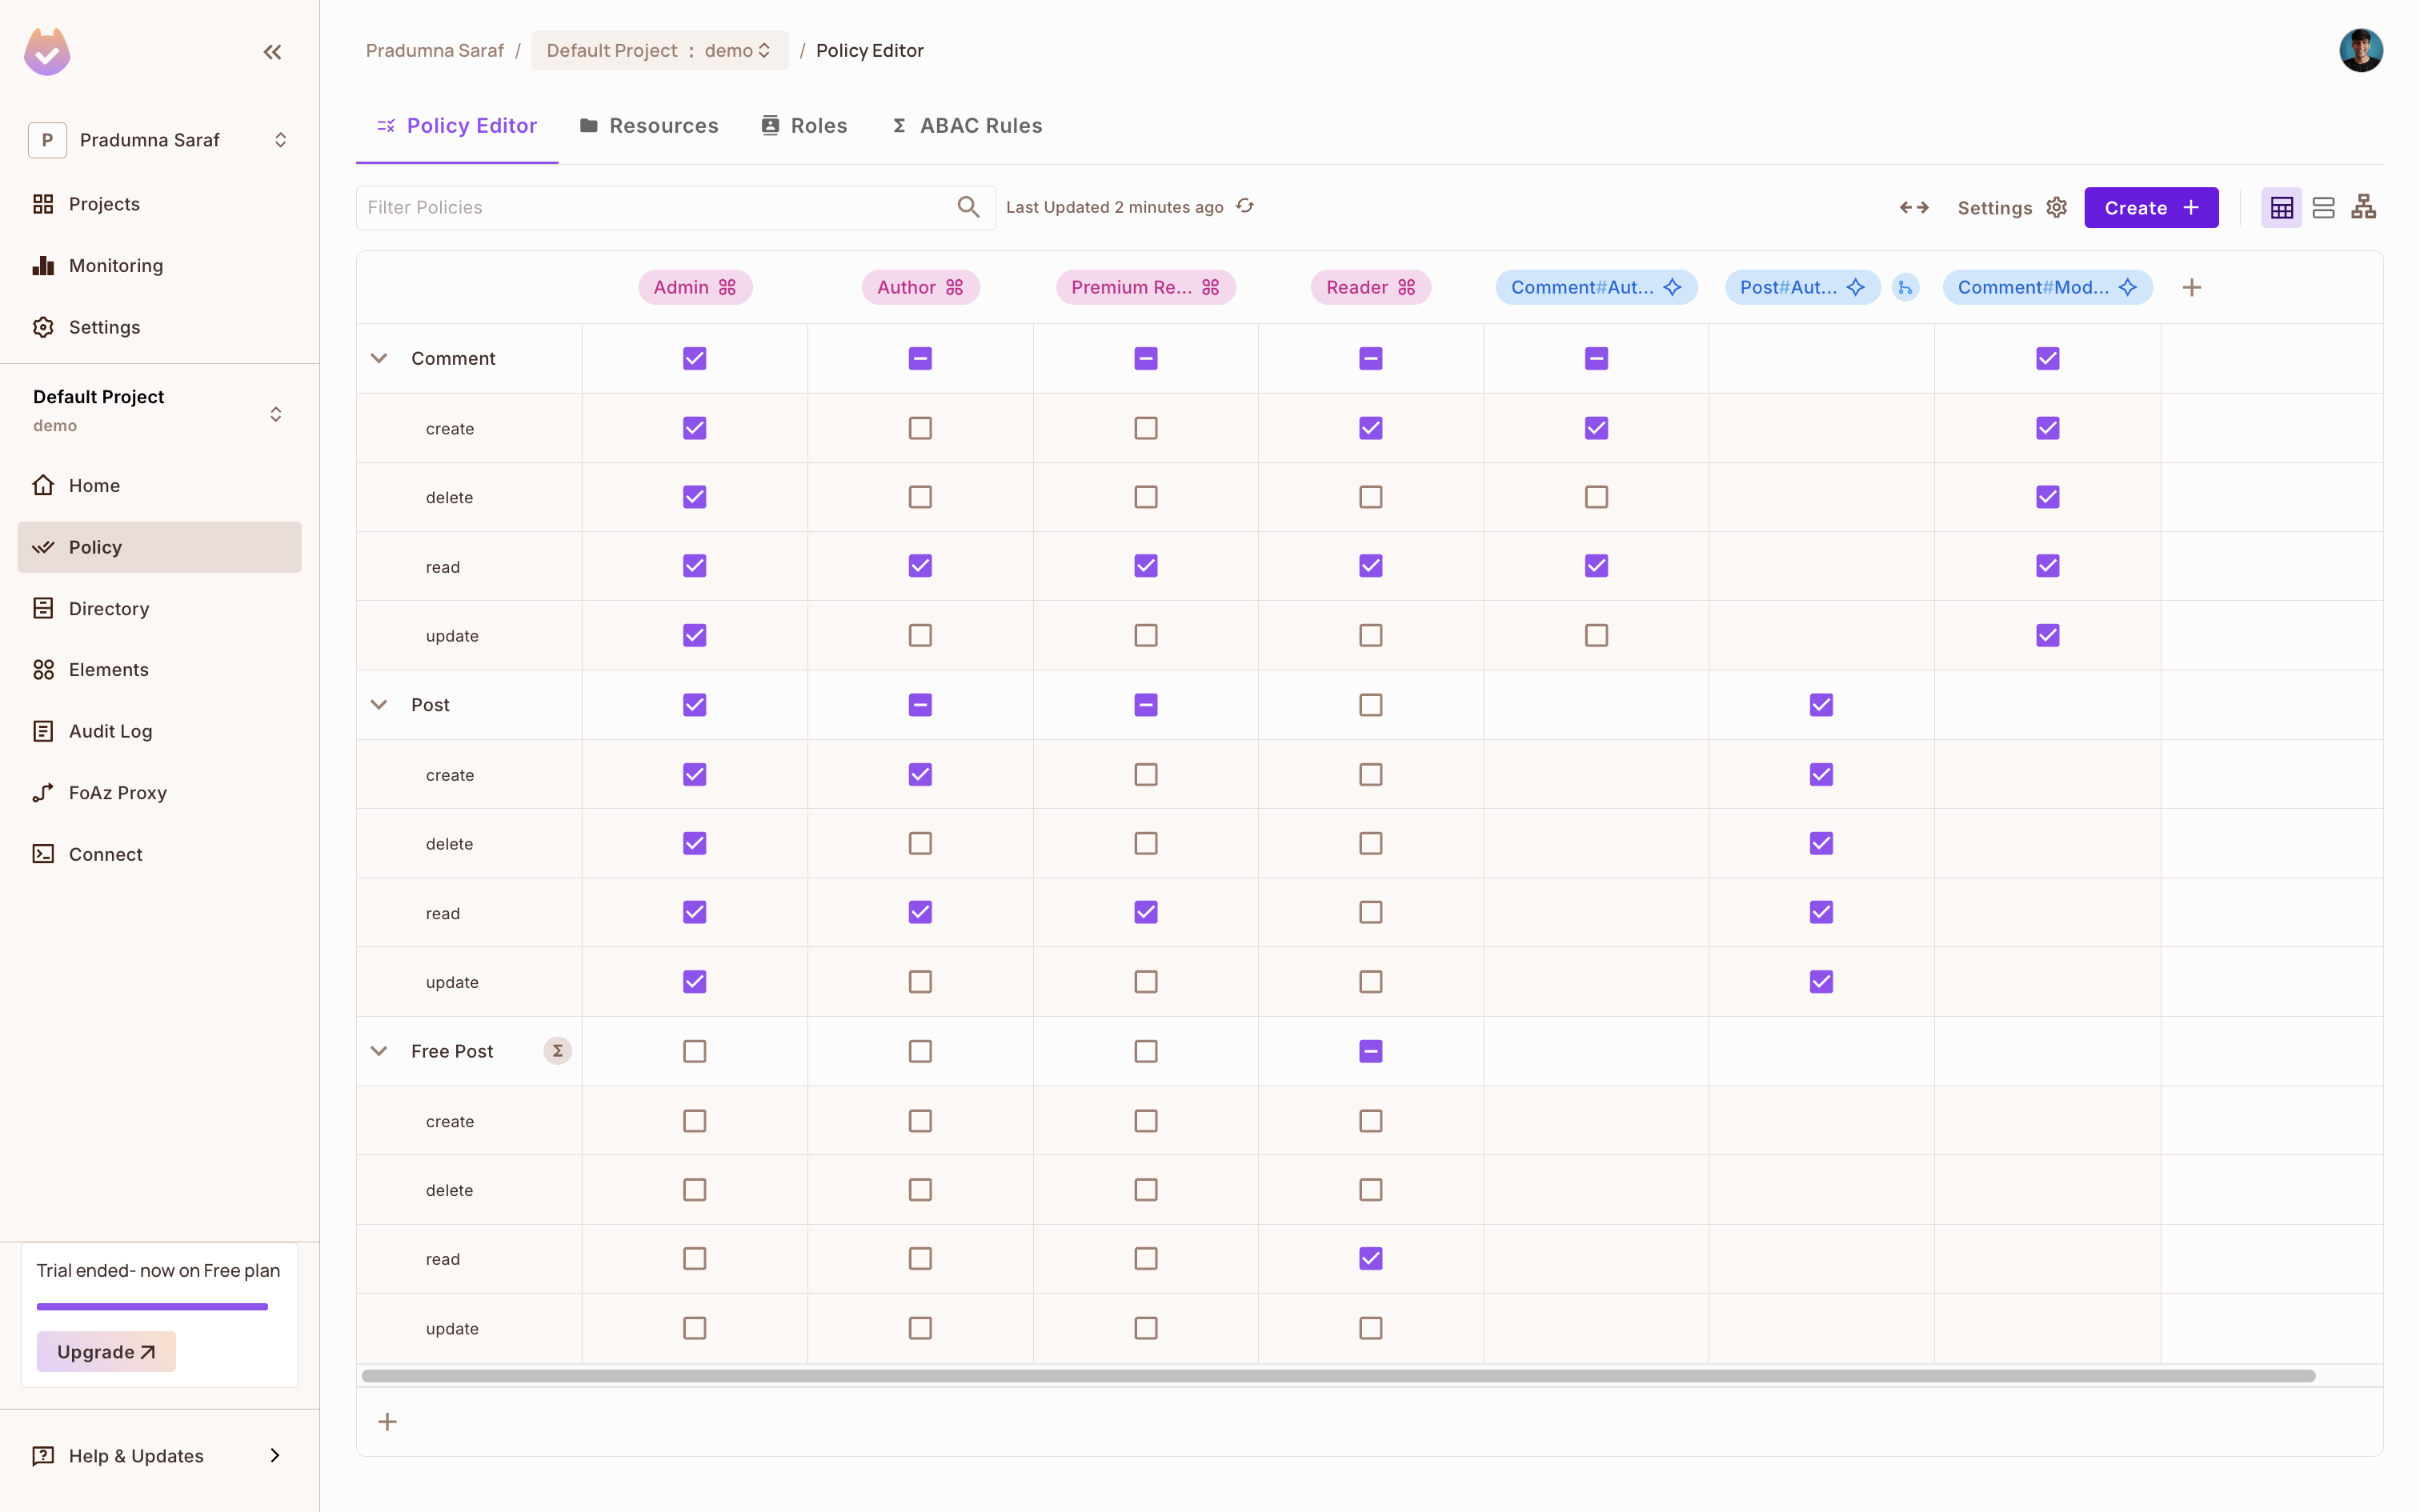
As we can see in the image below, the CLI has created Resources, Roles, and Policies. Now, let's add Read permission to the Viewer for the Visit resource. It is very easy to add permissions using the dashboard. We can also add more roles and resources as per our needs.
To get the API key, click on Projects from the left sidebar, then click on the three dots on the environment we want to use, and click on Copy API Key and store it in a safe place. We will be using this API key to authenticate our application with Permit.io. If you are having any difficulty getting the API key, follow this guide.
Once we are done, let's move toward the implementation part and integrate Permit.io with our Express.js application.
Spring Boot Integration
Once you have a Spring Boot application ready (or you can create a new one for the sake of this guide), we can start integrating Permit.io with it. Add Permit's dependency to your pom.xml file (it may vary depending on your project setup).
Read more about the Java SDK here.
<dependency>
  <groupId>io.permit</groupId>
  <artifactId>permit-sdk-java</artifactId>
  <version>2.0.0</version>
</dependency>
Then install the dependency by mvn clean install.
Now, let's define the entry point of a Spring Boot application named PermitdemoApplication. It uses the @SpringBootApplication annotation to enable auto-configuration, component scanning, and configuration support. The main() method calls SpringApplication.run(), which starts the Spring Boot application and its embedded web server, making it ready to handle web requests.
package com.example.permitdemo;

import org.springframework.boot.SpringApplication;
import org.springframework.boot.autoconfigure.SpringBootApplication;

@SpringBootApplication
public class PermitdemoApplication {
    public static void main(String[] args) {
        SpringApplication.run(PermitdemoApplication.class, args);
    }
}
Let's create a Permit controller to handle the requests. The controller will have three endpoints: one to sync the user, one to create a tenant, and one to check access. The controller will use the Permit SDK to interact with Permit.io.
package com.example.permitdemo;

import io.permit.sdk.Permit;
import io.permit.sdk.PermitConfig;
import io.permit.sdk.api.PermitApiError;
import io.permit.sdk.api.PermitContextError;
import io.permit.sdk.enforcement.Resource;
import io.permit.sdk.enforcement.User;
import io.permit.sdk.openapi.models.UserRead;
import io.permit.sdk.openapi.models.UserCreate;
import io.permit.sdk.openapi.models.TenantCreate;
import io.permit.sdk.openapi.models.TenantRead;
import org.springframework.beans.factory.annotation.Value;
import org.springframework.http.HttpStatus;
import org.springframework.http.ResponseEntity;
import org.springframework.web.bind.annotation.*;

import java.io.IOException;
import java.util.Map;

@RestController
public class PermitController {

    private final Permit permit;

    public PermitController(
            @Value("${PERMIT_API_KEY}") String apiKey,
            @Value("${PDP_URL}") String pdpUrl
    ) {
        this.permit = new Permit(
                new PermitConfig.Builder(apiKey)
                        .withPdpAddress(pdpUrl)
                        .withDebugMode(true)
                        .build()
        );
    }

    @PostMapping("/sync-user")
    public ResponseEntity<?> syncUser(@RequestBody Map<String, String> body) {
        String email = body.get("email");
        String firstName = body.get("first_name");
        String lastName = body.get("last_name");

        if (email == null || firstName == null || lastName == null) {
            return ResponseEntity.badRequest().body(Map.of("error", "Missing required fields"));
        }

        try {
            UserRead user = permit.api.users.sync(
                    new UserCreate(email)
                            .withEmail(email)
                            .withFirstName(firstName)
                            .withLastName(lastName)
            ).getResult();
            return ResponseEntity.status(HttpStatus.CREATED).body(user);
        } catch (IOException | PermitApiError | PermitContextError e) {
            e.printStackTrace();
            return ResponseEntity.status(HttpStatus.INTERNAL_SERVER_ERROR)
                    .body(Map.of("error", "Failed to sync user"));
        }
    }

    @PostMapping("/create-tenant")
    public ResponseEntity<?> createTenant(@RequestBody Map<String, String> body) {
        String key = body.get("key");
        String name = body.get("name");
        String description = body.get("description");

        if (key == null || name == null) {
            return ResponseEntity.badRequest().body(Map.of("error", "Missing key or name"));
        }

        try {
            TenantCreate tenantCreate = new TenantCreate(key, name).withDescription(description);
            TenantRead tenant = permit.api.tenants.create(tenantCreate);
            return ResponseEntity.status(HttpStatus.CREATED).body(tenant);
        } catch (Exception e) {
            e.printStackTrace();
            return ResponseEntity.status(HttpStatus.INTERNAL_SERVER_ERROR)
                    .body(Map.of("error", "Failed to create tenant"));
        }
    }

    // Check if the user has access to the resource
    @PostMapping("/check-permission")
    public ResponseEntity<?> checkPermission(@RequestBody Map<String, Object> body) {
        String userKey = (String) body.get("user");
        String action = (String) body.get("action");
        String resource = (String) body.get("resource");

        if (userKey == null || action == null || resource == null) {
            return ResponseEntity.badRequest().body(Map.of("error", "Missing required fields"));
        }

        try {
            boolean permitted = permit.check(
                    User.fromString(userKey),
                    action,
                    new Resource.Builder(resource).withTenant("default").build()
            );
            if (permitted) {
                return ResponseEntity.ok(Map.of("message", "User is permitted"));
            } else {
                return ResponseEntity.status(HttpStatus.FORBIDDEN)
                        .body(Map.of("message", "User is not permitted"));
            }
        } catch (Exception e) {
            e.printStackTrace();
            return ResponseEntity.status(HttpStatus.INTERNAL_SERVER_ERROR)
                    .body(Map.of("error", "Permission check failed"));
        }
    }
}
At the top of the file, we import the necessary classes from the Permit SDK and Spring Boot. The PermitController class is annotated with @RestController, which indicates that it is a controller that handles HTTP requests and responses. The constructor initializes the Permit SDK. It needs two environment variables PERMIT_API_KEY and PDP_URL. The PERMIT_API_KEY is the API key we copied from the Permit dashboard, and the PDP_URL is the URL of the PDP server. We will set this up later.
The endpoint /sync-user is used to sync a user with Permit.io. It expects a JSON body with the following fields: email, first_name, and last_name. The endpoint will return the created user object in the response. The endpoint /create-tenant is used to create a tenant with Permit.io. It expects a JSON body with the following fields: key, name, and description. The endpoint will return the created tenant object in the response. The endpoint /check-permission is used to check if a user has access to a resource. It expects a JSON body with the following fields: user, action, and resource. The endpoint will return a boolean value indicating if the user is permitted to access the resource.
Update the application.properties file under the src/main/resources folder with the API key and PDP URL. The API key can be found in the Permit dashboard as mentioned above. The PDP URL is the URL of the PDP server that we will run locally.
Setting up the PDP server
Before we run the application and check the routes and enforcement, we need to set up the PDP. To enforce the policy, we use Permit's PDP (Policy Decision Point) to check if the user has access to the resource. So first, let's set up the PDP.
We can leverage Permit's CLI to start a PDP server locally. Otherwise, we would need to run long Docker commands to start the PDP server. The PDP server is a service that evaluates access requests and returns a decision (permit or deny) based on the policies defined in Permit.io. To start it, execute the command below in your terminal. Make sure Docker is running on your machine, as this will start a PDP container locally.
permit pdp run
Once you execute the above command, you will see an output like the one below with information such as container ID, name, etc. It will start a PDP server locally on your machine. You can check the logs to see if the PDP server is running successfully. The PDP server will be running on port 7766 by default. You can also change the port.

Once the PDP server is running, update the PDP_URL environment variable in your application.
Syncing the user
Now we have everything ready. Let's run the application and do curl requests to test the endpoint for the sync user route.
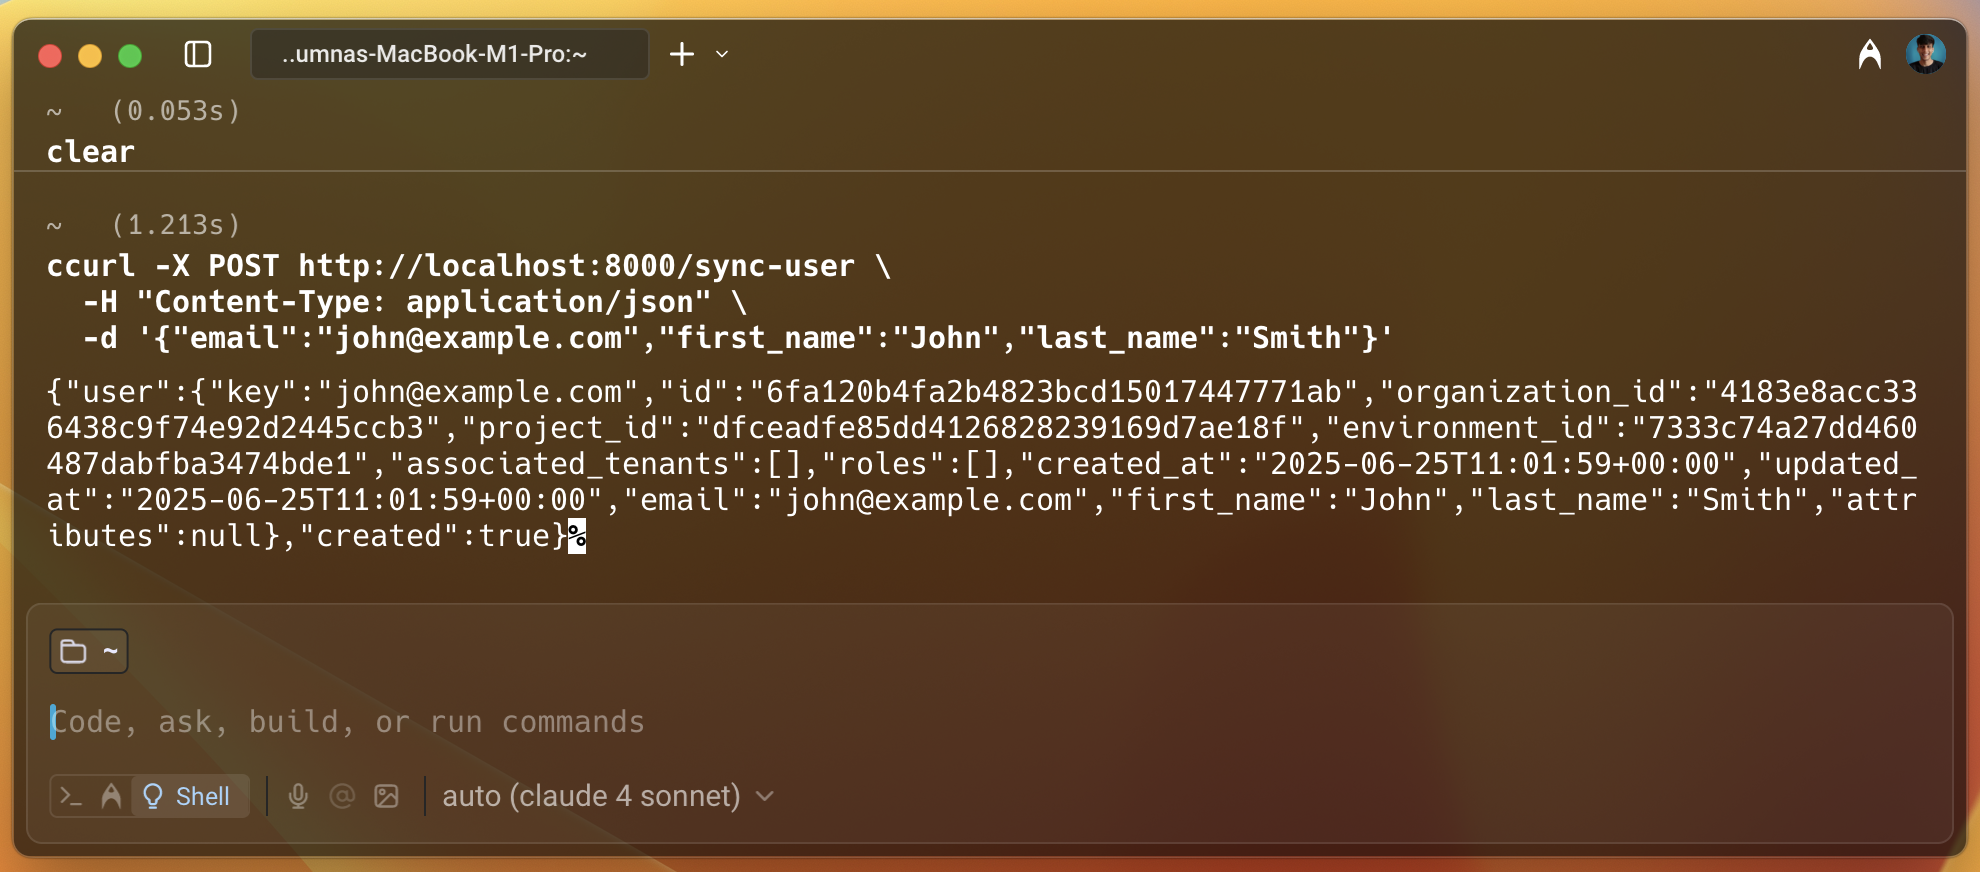
As we can see in the image above, the user is created successfully, and we get a lot of information about the user in the response, such as id, project_id, key, etc.
Giving the user access to the resource
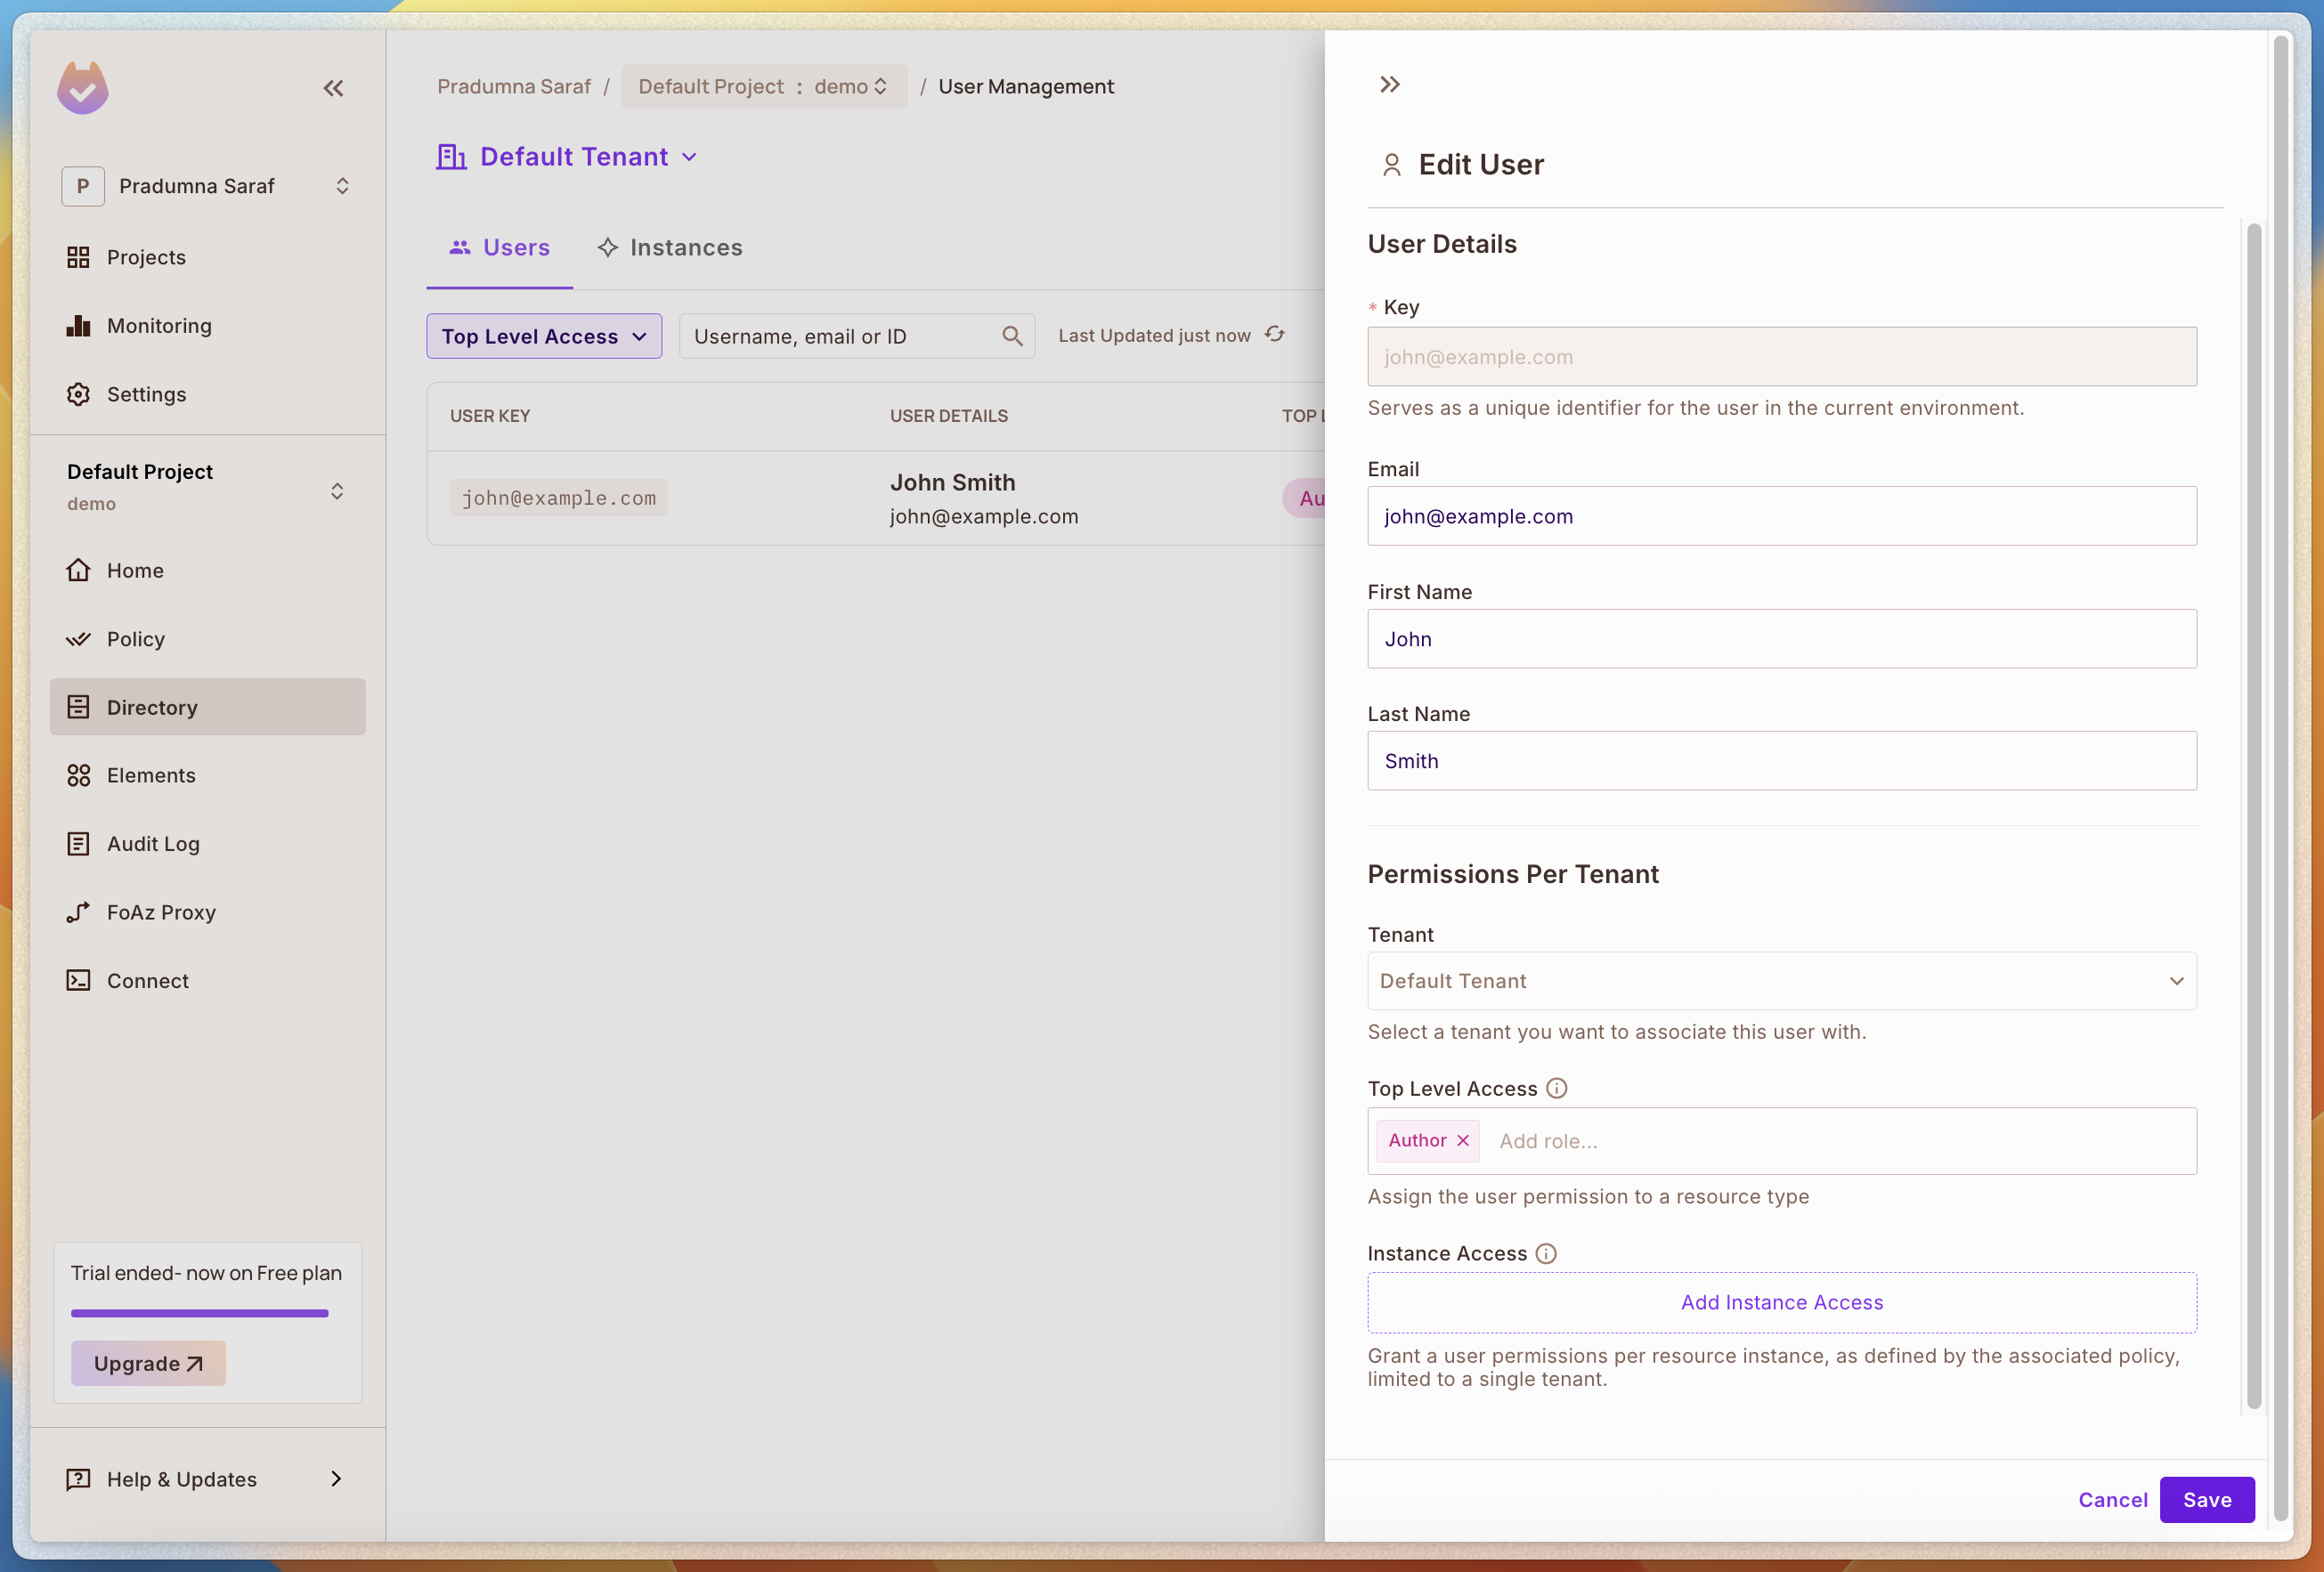
Let's now head over to the Permit dashboard and check if the user is created successfully. To do that, select Directory from the left sidebar, and we can see the user we just created. Let's give this user access to the resource we created in the policy. To do that, select the user we just created. Then click on the Add Role button, select Tenant, and then select the Viewer role and save it. This will give the user access to the Visit resource we created in the policy. We will verify this later when we check the access. Also, we can give the access programmatically, it was a demo to show how easy it is to add access using the dashboard.
We can also add more roles and resources as per our needs. Now, let's set up the PDP server and check the access.
Checking the access
Now, let's check the policy enforcement. As we have added the user to the Viewer role, we can check if the user has access to the resource. To do that, we will use the curl command to make a request to the /api/protected/secret route we created earlier.
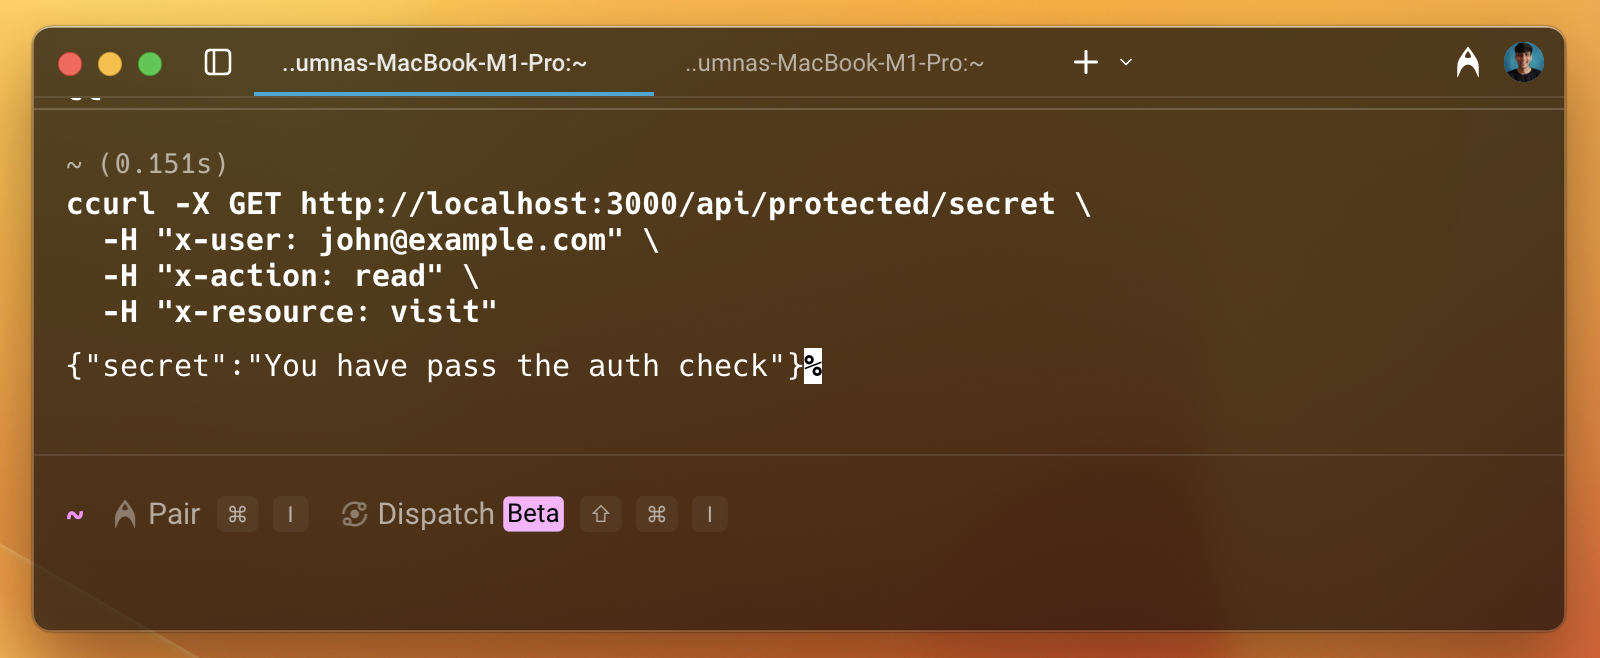
As we can see in the image above, the user is permitted to access the resource. Let's remove the access from the dashboard and check again.
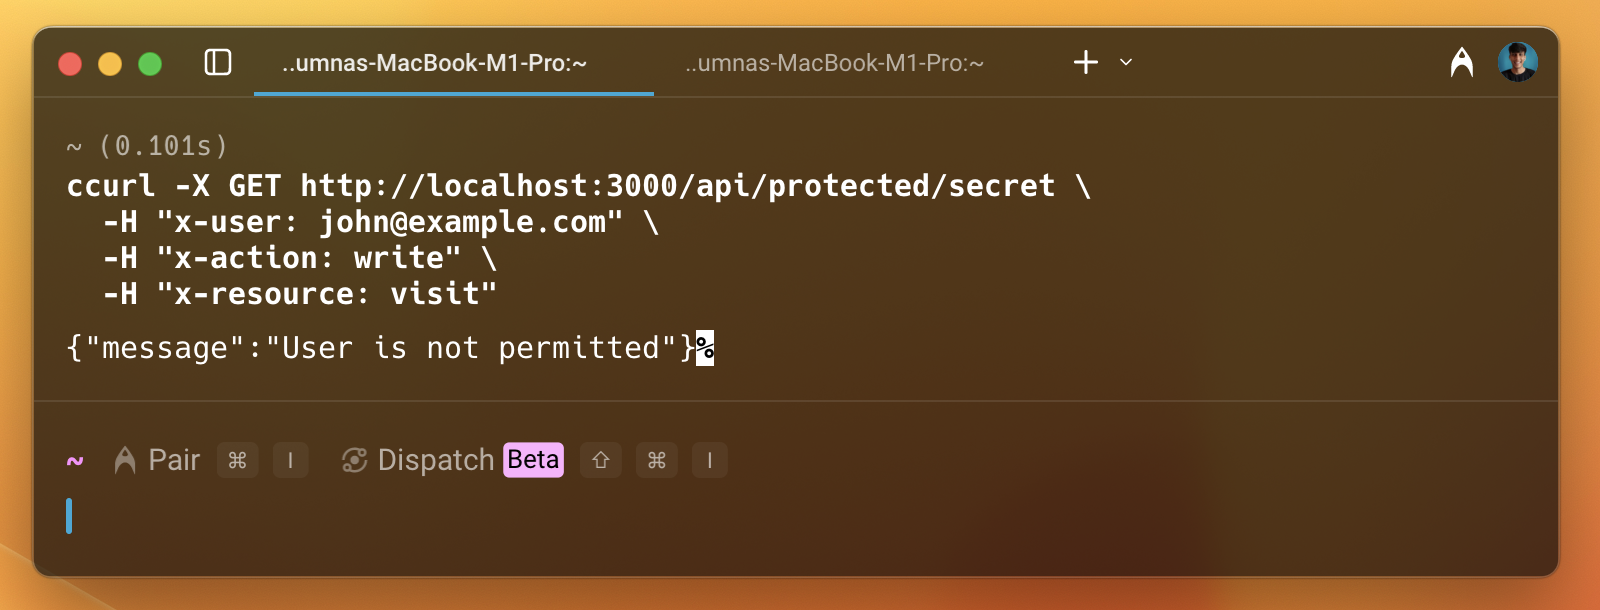
Now, this time, we can see that the user is not permitted to access the resource. This is how we can enforce policies using Permit.io with Spring Boot.
Conclusion
In this guide, we have seen how to integrate Permit.io with Spring Boot. We created a policy with a template using the Permit CLI, synced a user, created a tenant, and checked the access using the Permit SDK. We also saw how to set up the PDP server locally using Docker. This is just the beginning, and there are many more features and functionalities that Permit.io offers.