ASP.NET
Learn how to leverage the Permit API and SDK to seamlessly integrate robust access control into your ASP.NET application. This step-by-step guide walks you through setting up your environment, creating policies with the Permit CLI with minimal code and maximum flexibility.
In this guide, we will quickly go through the steps to integrate Permit.io with ASP.NET. We will use Permit's CLI to create a new environment and a policy with a template. Then, we will use the Permit SDK to integrate it with our ASP.NET application. We will also set up the PDP (Policy Decision Point) server locally using Docker.
Prerequisites
- ASP.NET application
- Docker (for running the PDP server)
- Node.js (for installing and running the Permit CLI)
- Permit.io account (Follow this guide to create an account)
Installing the Permit CLI
We will first install the Permit CLI. Permit CLI is a command-line tool that allows you to create policies, run the PDP server, and perform other tasks. To install the CLI, execute the command below in your terminal.
npm install -g @permitio/cli
Once the installation is complete, execute permit to confirm the installation.
Authenticating the CLI
To use the CLI, we need to authenticate it with our Permit account. To authenticate, execute
permit login
This will open a browser window and ask you to log in with your Permit account. After logging in, the CLI will be authenticated and ready to use. This will also log you into the default environment (a project can have multiple environments). We can change the environment by executing permit env select and then selecting the environment we want to use.
Creating a policy with a template
Now, let's create a policy with a template. The benefit of using a template is that we can create a policy with predefined roles and resources using best practices. This will save us time and effort in creating a policy from scratch. To check the available templates, execute permit template list. Based on our needs, we can apply the template to a new policy by executing permit template apply --template <template-name>.
We will be using the blog-rbac template to create a new policy. This template is great for a blog application. It has a Viewer role that can view the blog posts and a Editor role that can edit the blog posts. It also has a Post resource that represents a blog post.....
To apply the template, execute the command below.
permit template apply --template blog-rbac
This will create a new policy with the blog-rbac template
Accessing the policy
Now, let's visit the Permit dashboard to check the created policy and also get the API key that we will use to authenticate our application when using the Permit SDK.
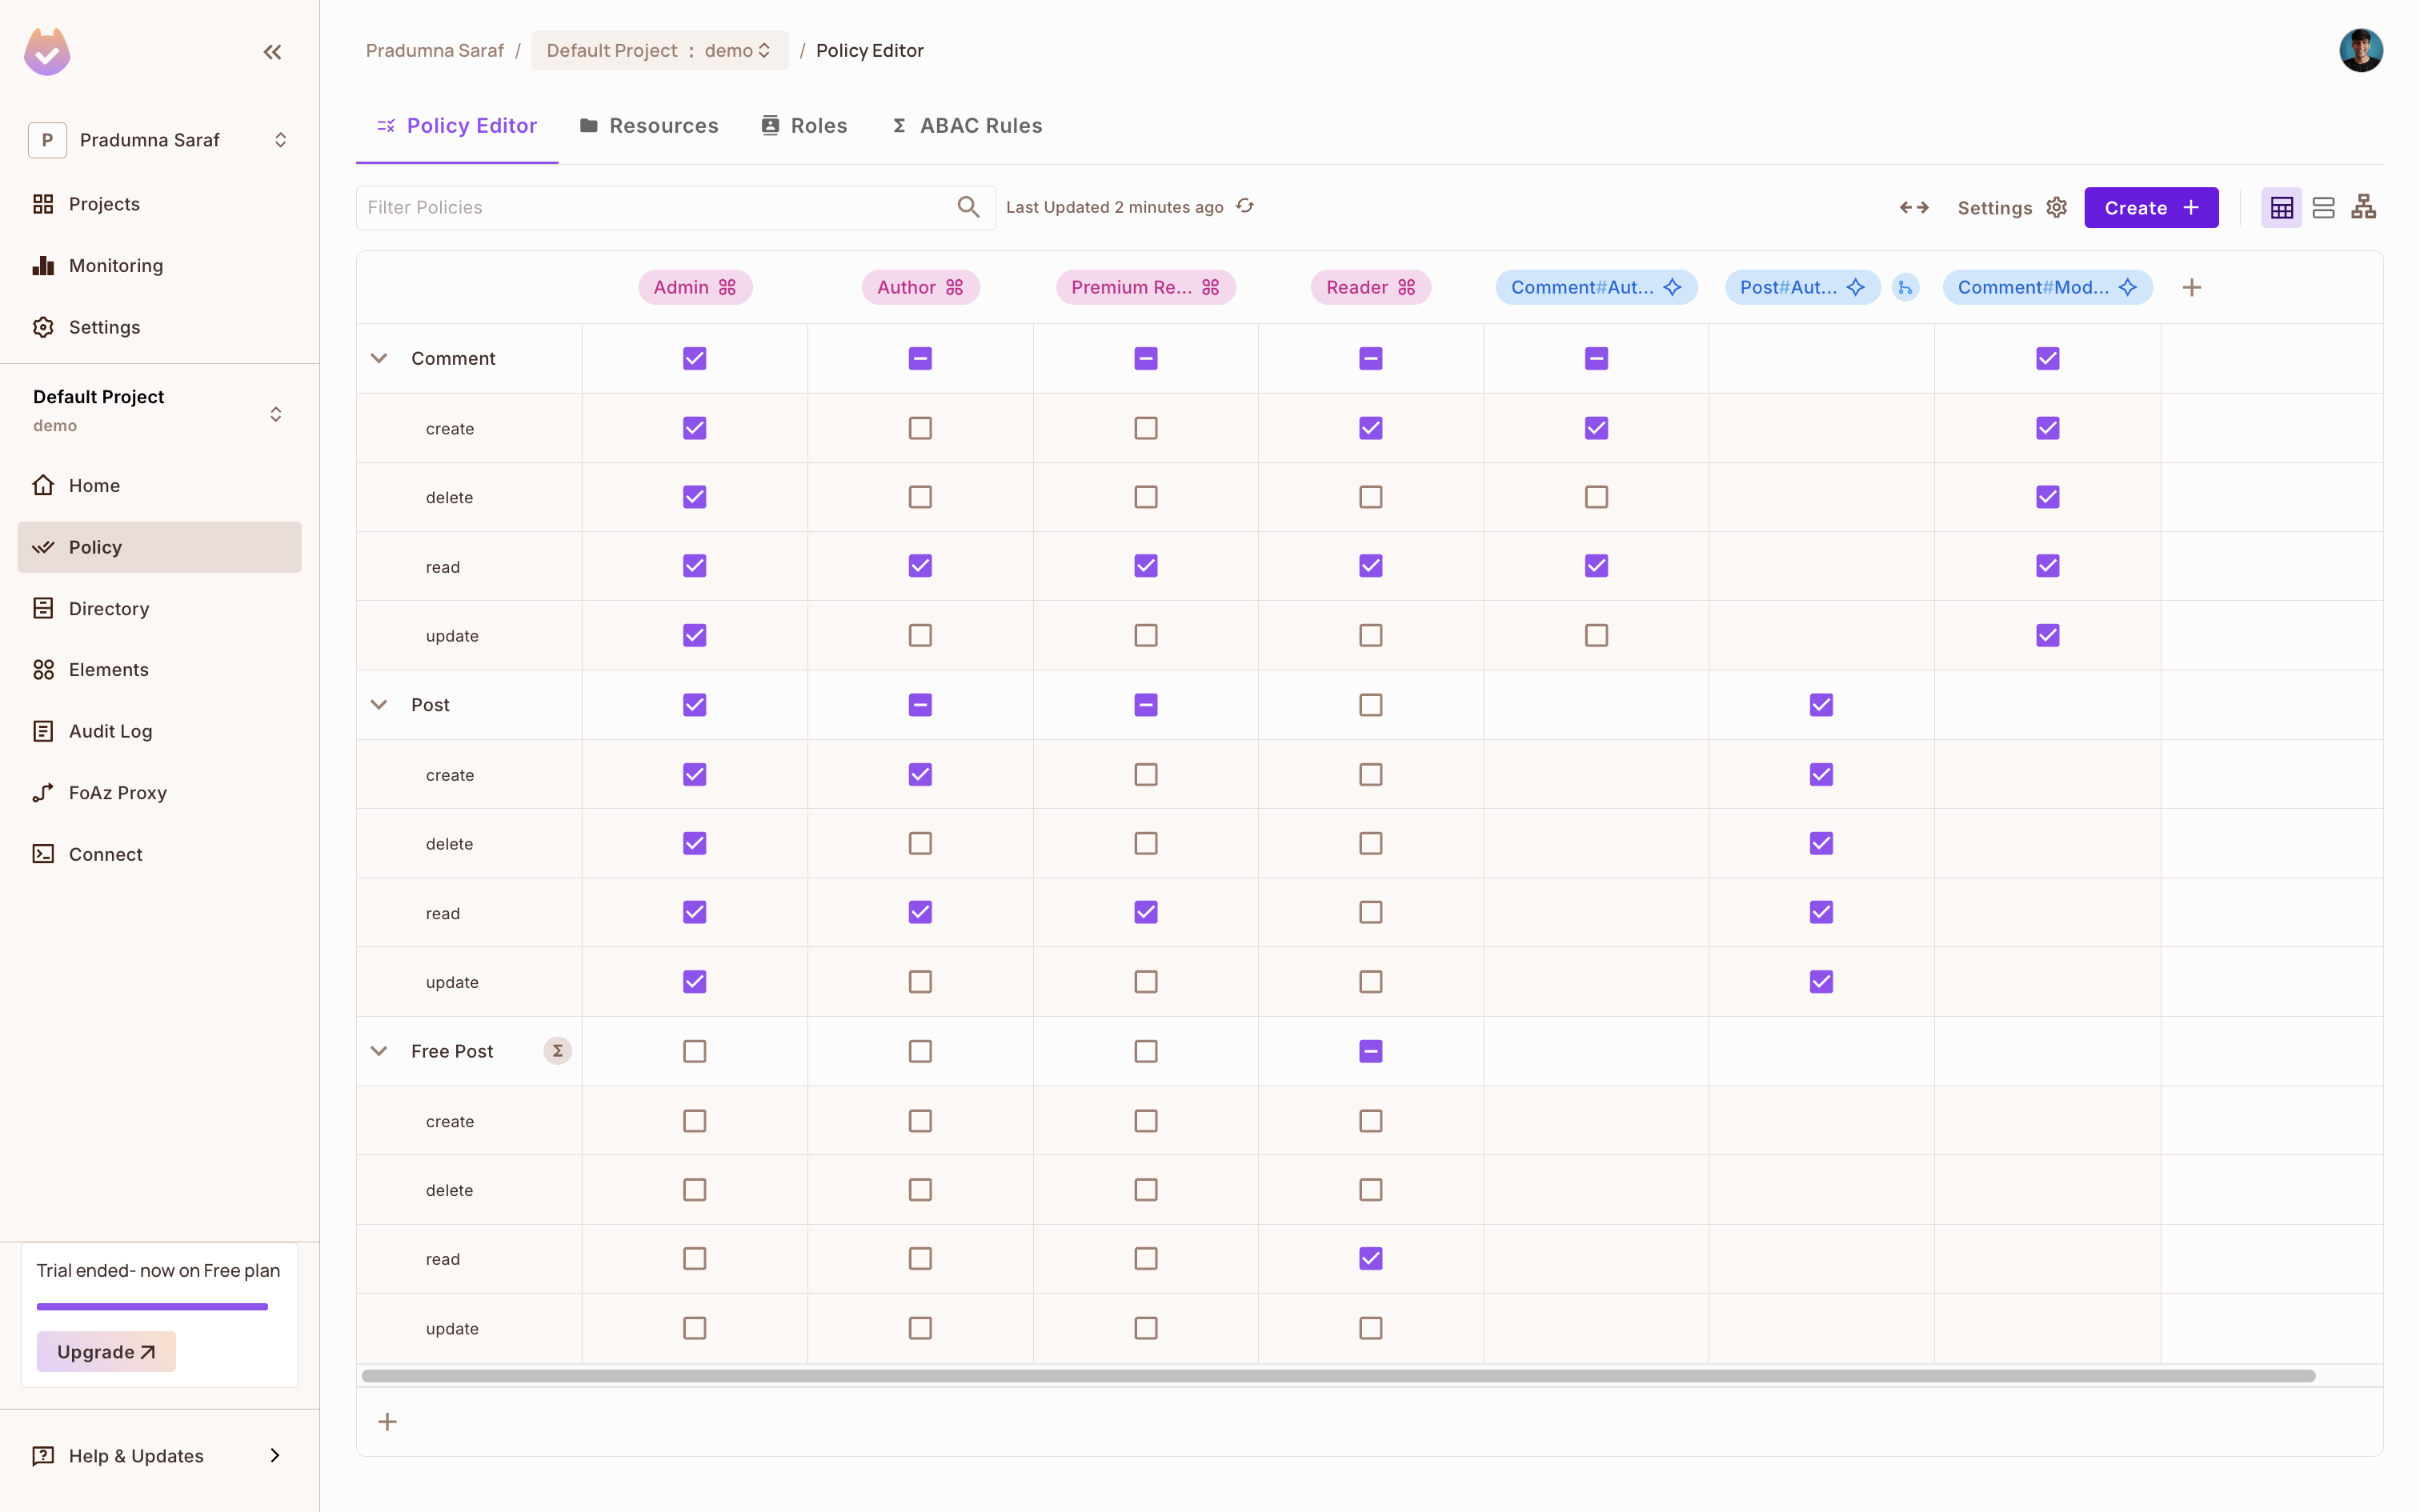
As we can see in the image below, the CLI has created Resources, Roles, and Policies. Now, let's add Read permission to the Viewer for the Visit resource. It is very easy to add permissions using the dashboard. We can also add more roles and resources as per our needs.
To get the API key, click on Projects from the left sidebar, then click on the three dots on the environment we want to use, and click on Copy API Key and store it in a safe place. We will be using this API key to authenticate our application with Permit.io. If you are having any difficulty getting the API key, follow this guide.
Once we are done, let's move toward the implementation part and integrate Permit.io with our Express.js application.
.NET Integration
Once you have your .NET application ready (or you can create a new one for the sake of this guide), we can start integrating the Permit's .NET SDK. To install the Permit SDK, execute the command below in your terminal.
dotnet add package Permit
Read more about the .NET SDK here.
Once we have installed the SDK, let's now create three endpoints to sync a user, create a tenant, and check permission. We will be using the HttpListener class to create a simple HTTP server that will listen for incoming requests. We will create three endpoints:
// Program.cs
using System;
using System.Text;
using System.Net;
using System.Threading.Tasks;
using System.IO;
using System.Text.Json;
using PermitSDK;
using PermitSDK.OpenAPI.Models;

namespace PermitOnboardingApp
{
    class HttpServer
    {
        public static HttpListener listener;
        public static string url = "http://localhost:8000/";
        public static string clientToken = Environment.GetEnvironmentVariable("PERMIT_API_KEY");
        public static string pdpUrl = Environment.GetEnvironmentVariable("PDP_URL");

        public static Permit permit = new Permit(
            clientToken,
            pdpUrl,
            "default",
            true
        );

        public static async Task HandleSyncUser(HttpListenerRequest req, HttpListenerResponse resp)
        {
            using var reader = new StreamReader(req.InputStream, req.ContentEncoding);
            var body = await reader.ReadToEndAsync();
            var data = JsonSerializer.Deserialize<SyncUserRequest>(body);
            if (data == null || string.IsNullOrEmpty(data.email) || string.IsNullOrEmpty(data.first_name) || string.IsNullOrEmpty(data.last_name))
            {
                resp.StatusCode = 400;
                await SendJsonAsync(resp, new { error = "Missing required fields" });
                return;
            }
            var userObj = new UserCreate
            {
                Key = data.email,
                Email = data.email,
                First_name = data.first_name,
                Last_name = data.last_name,
                Attributes = new System.Collections.Generic.Dictionary<string, object>()
            };
            var user = await permit.Api.SyncUser(userObj);
            resp.StatusCode = 201;
            await SendJsonAsync(resp, user);
        }

        public static async Task HandleCreateTenant(HttpListenerRequest req, HttpListenerResponse resp)
        {
            using var reader = new StreamReader(req.InputStream, req.ContentEncoding);
            var body = await reader.ReadToEndAsync();
            var data = JsonSerializer.Deserialize<CreateTenantRequest>(body);
            if (data == null || string.IsNullOrEmpty(data.key) || string.IsNullOrEmpty(data.name))
            {
                resp.StatusCode = 400;
                await SendJsonAsync(resp, new { error = "Missing required fields" });
                return;
            }
            var tenantObj = new TenantCreate
            {
                Key = data.key,
                Name = data.name,
                Description = data.description,
                Attributes = new System.Collections.Generic.Dictionary<string, object>()
            };
            var tenant = await permit.Api.CreateTenant(tenantObj);
            resp.StatusCode = 201;
            await SendJsonAsync(resp, tenant);
        }

        public static async Task HandleCheckPermission(HttpListenerRequest req, HttpListenerResponse resp)
        {
            using var reader = new StreamReader(req.InputStream, req.ContentEncoding);
            var body = await reader.ReadToEndAsync();
            var data = JsonSerializer.Deserialize<CheckPermissionRequest>(body);
            if (data == null || string.IsNullOrEmpty(data.user) || string.IsNullOrEmpty(data.action) || string.IsNullOrEmpty(data.resource))
            {
                resp.StatusCode = 400;
                await SendJsonAsync(resp, new { error = "Missing required fields" });
                return;
            }
            bool permitted = await permit.Check(data.user, data.action, data.resource);
            resp.StatusCode = permitted ? 200 : 403;
            await SendJsonAsync(resp, new { message = permitted ? "User is permitted" : "User is not permitted" });
        }

        public static async Task SendJsonAsync(HttpListenerResponse resp, object obj)
        {
            resp.ContentType = "application/json";
            var json = JsonSerializer.Serialize(obj);
            var buffer = Encoding.UTF8.GetBytes(json);
            await resp.OutputStream.WriteAsync(buffer, 0, buffer.Length);
            resp.Close();
        }

        public static async Task HandleIncomingConnections()
        {
            while (true)
            {
                var ctx = await listener.GetContextAsync();
                var req = ctx.Request;
                var resp = ctx.Response;

                if (req.HttpMethod == "POST" && req.Url.AbsolutePath == "/sync-user")
                    await HandleSyncUser(req, resp);
                else if (req.HttpMethod == "POST" && req.Url.AbsolutePath == "/create-tenant")
                    await HandleCreateTenant(req, resp);
                else if (req.HttpMethod == "POST" && req.Url.AbsolutePath == "/check-permission")
                    await HandleCheckPermission(req, resp);
                else
                {
                    resp.StatusCode = 404;
                    await SendJsonAsync(resp, new { error = "Not found" });
                }
            }
        }

        static void Main(string[] args)
        {
            listener = new HttpListener();
            listener.Prefixes.Add(url);
            listener.Start();
            Console.WriteLine($"Listening for connections on {url}");
            Task listenTask = HandleIncomingConnections();
            listenTask.GetAwaiter().GetResult();
            listener.Close();
        }
    }

    public class SyncUserRequest
    {
        public string email { get; set; }
        public string first_name { get; set; }
        public string last_name { get; set; }
    }

    public class CreateTenantRequest
    {
        public string key { get; set; }
        public string name { get; set; }
        public string description { get; set; }
    }

    public class CheckPermissionRequest
    {
        public string user { get; set; }
        public string action { get; set; }
        public string resource { get; set; }
    }
}
At the top we have imported the required namespaces. We have created a class HttpServer that will handle the incoming requests. We have created a static HttpListener object that will listen for incoming requests on the specified URL. We have also created a static Permit object that will be used to interact with the Permit API. It needs two environment variables PERMIT_API_KEY and PDP_URL. The PERMIT_API_KEY is the API key we copied from the Permit dashboard, and the PDP_URL is the URL of the PDP server. We will set this up later.
Then we have created three methods to handle the incoming requests. The HandleSyncUser method will handle the /sync-user endpoint, the HandleCreateTenant method will handle the /create-tenant endpoint, and the HandleCheckPermission method will handle the /check-permission endpoint. Each method will read the request body, deserialize it into a model, and then call the appropriate Permit API method.
The HandleSyncUser method will call the SyncUser method to sync a user, the HandleCreateTenant method will call the CreateTenant method to create a tenant, and the HandleCheckPermission method will call the Check method to check if the user has access to the resource.
The SendJsonAsync method will send the JSON response back to the client. The HandleIncomingConnections method will handle the incoming requests and call the appropriate method based on the request URL.
Finally, we have created a Main method that will start the HTTP server and listen for incoming requests. The server will run on port 8000 by default. You can change the port by updating the url variable.
At the end, we have created three classes: SyncUserRequest, CreateTenantRequest, and CheckPermissionRequest to handle the request body for each endpoint. The SyncUserRequest class is used to sync a user, the CreateTenantRequest class is used to create a tenant, and the CheckPermissionRequest class is used to check permission.
Everything is set up now. We can run the application and test the endpoints using curl commands.
Setting up the PDP server
Before we run the application and check the routes and enforcement, we need to set up the PDP. To enforce the policy, we use Permit's PDP (Policy Decision Point) to check if the user has access to the resource. So first, let's set up the PDP.
We can leverage Permit's CLI to start a PDP server locally. Otherwise, we would need to run long Docker commands to start the PDP server. The PDP server is a service that evaluates access requests and returns a decision (permit or deny) based on the policies defined in Permit.io. To start it, execute the command below in your terminal. Make sure Docker is running on your machine, as this will start a PDP container locally.
permit pdp run
Once you execute the above command, you will see an output like the one below with information such as container ID, name, etc. It will start a PDP server locally on your machine. You can check the logs to see if the PDP server is running successfully. The PDP server will be running on port 7766 by default. You can also change the port.

Once the PDP server is running, update the PDP_URL environment variable in the application.
Syncing the user
Now we have everything ready. Let's run the application and use curl requests to test the endpoint for the sync user route.
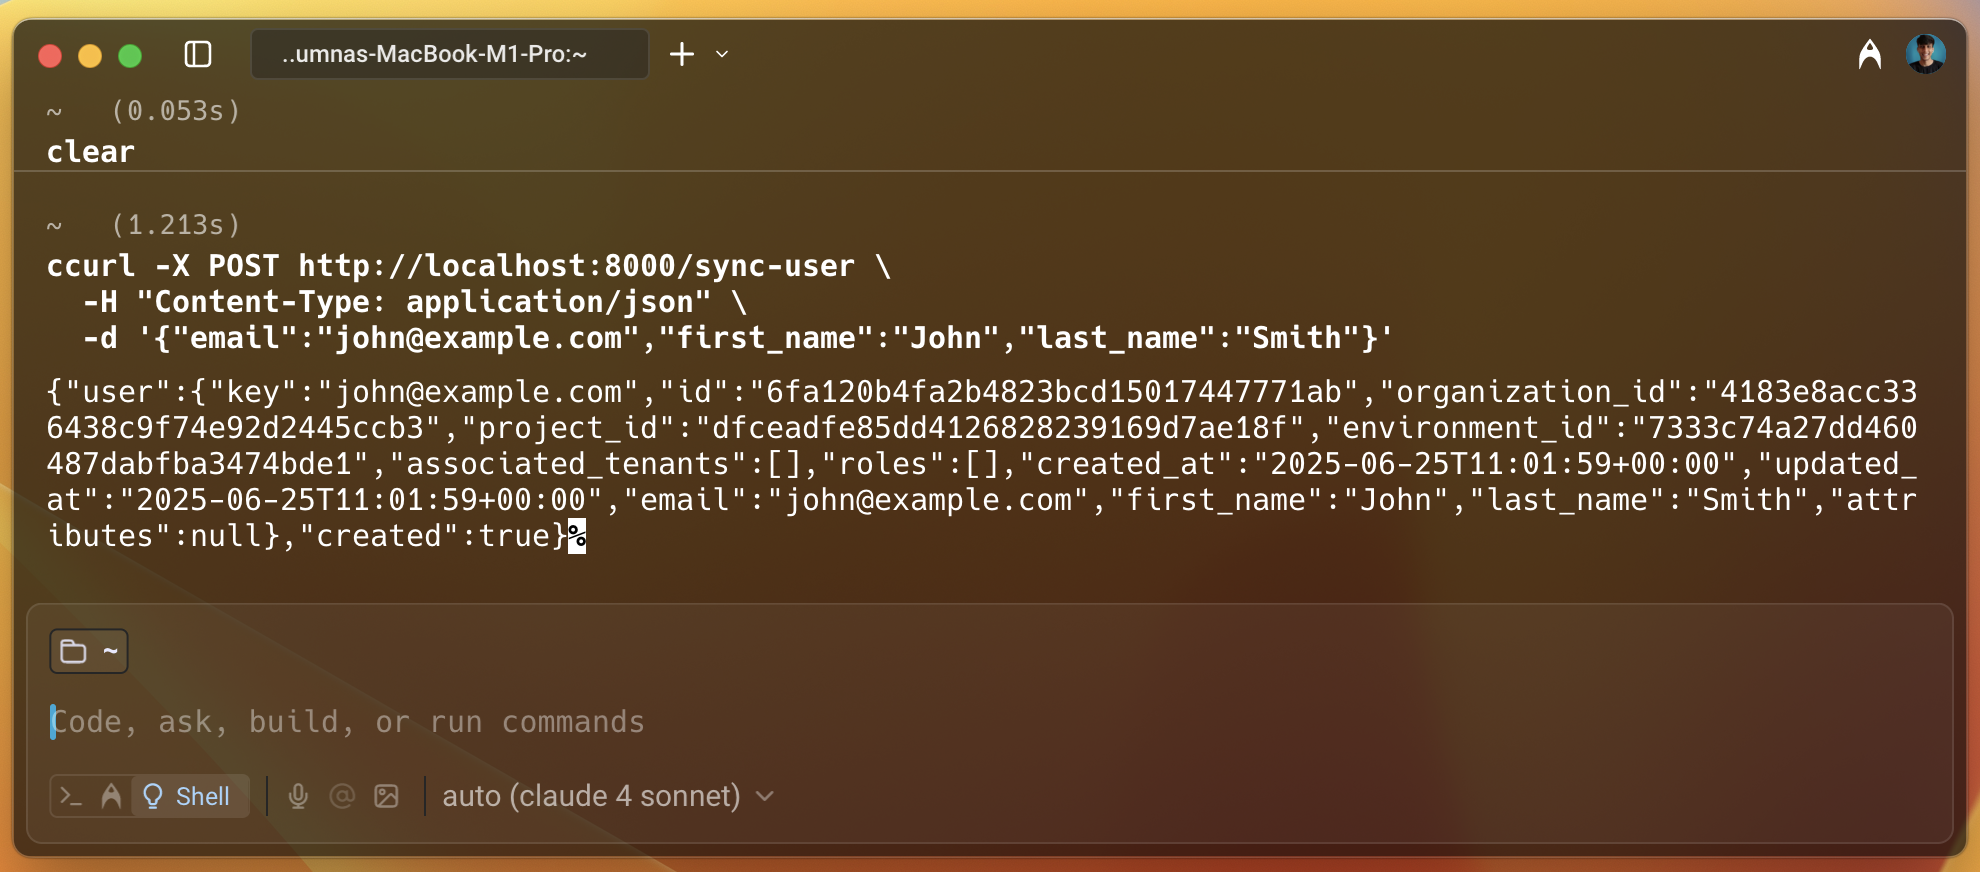
As we can see in the image above, the user is created successfully, and we get a lot of information about the user in the response, such as id, project_id, key, etc.
Giving the user access to the resource
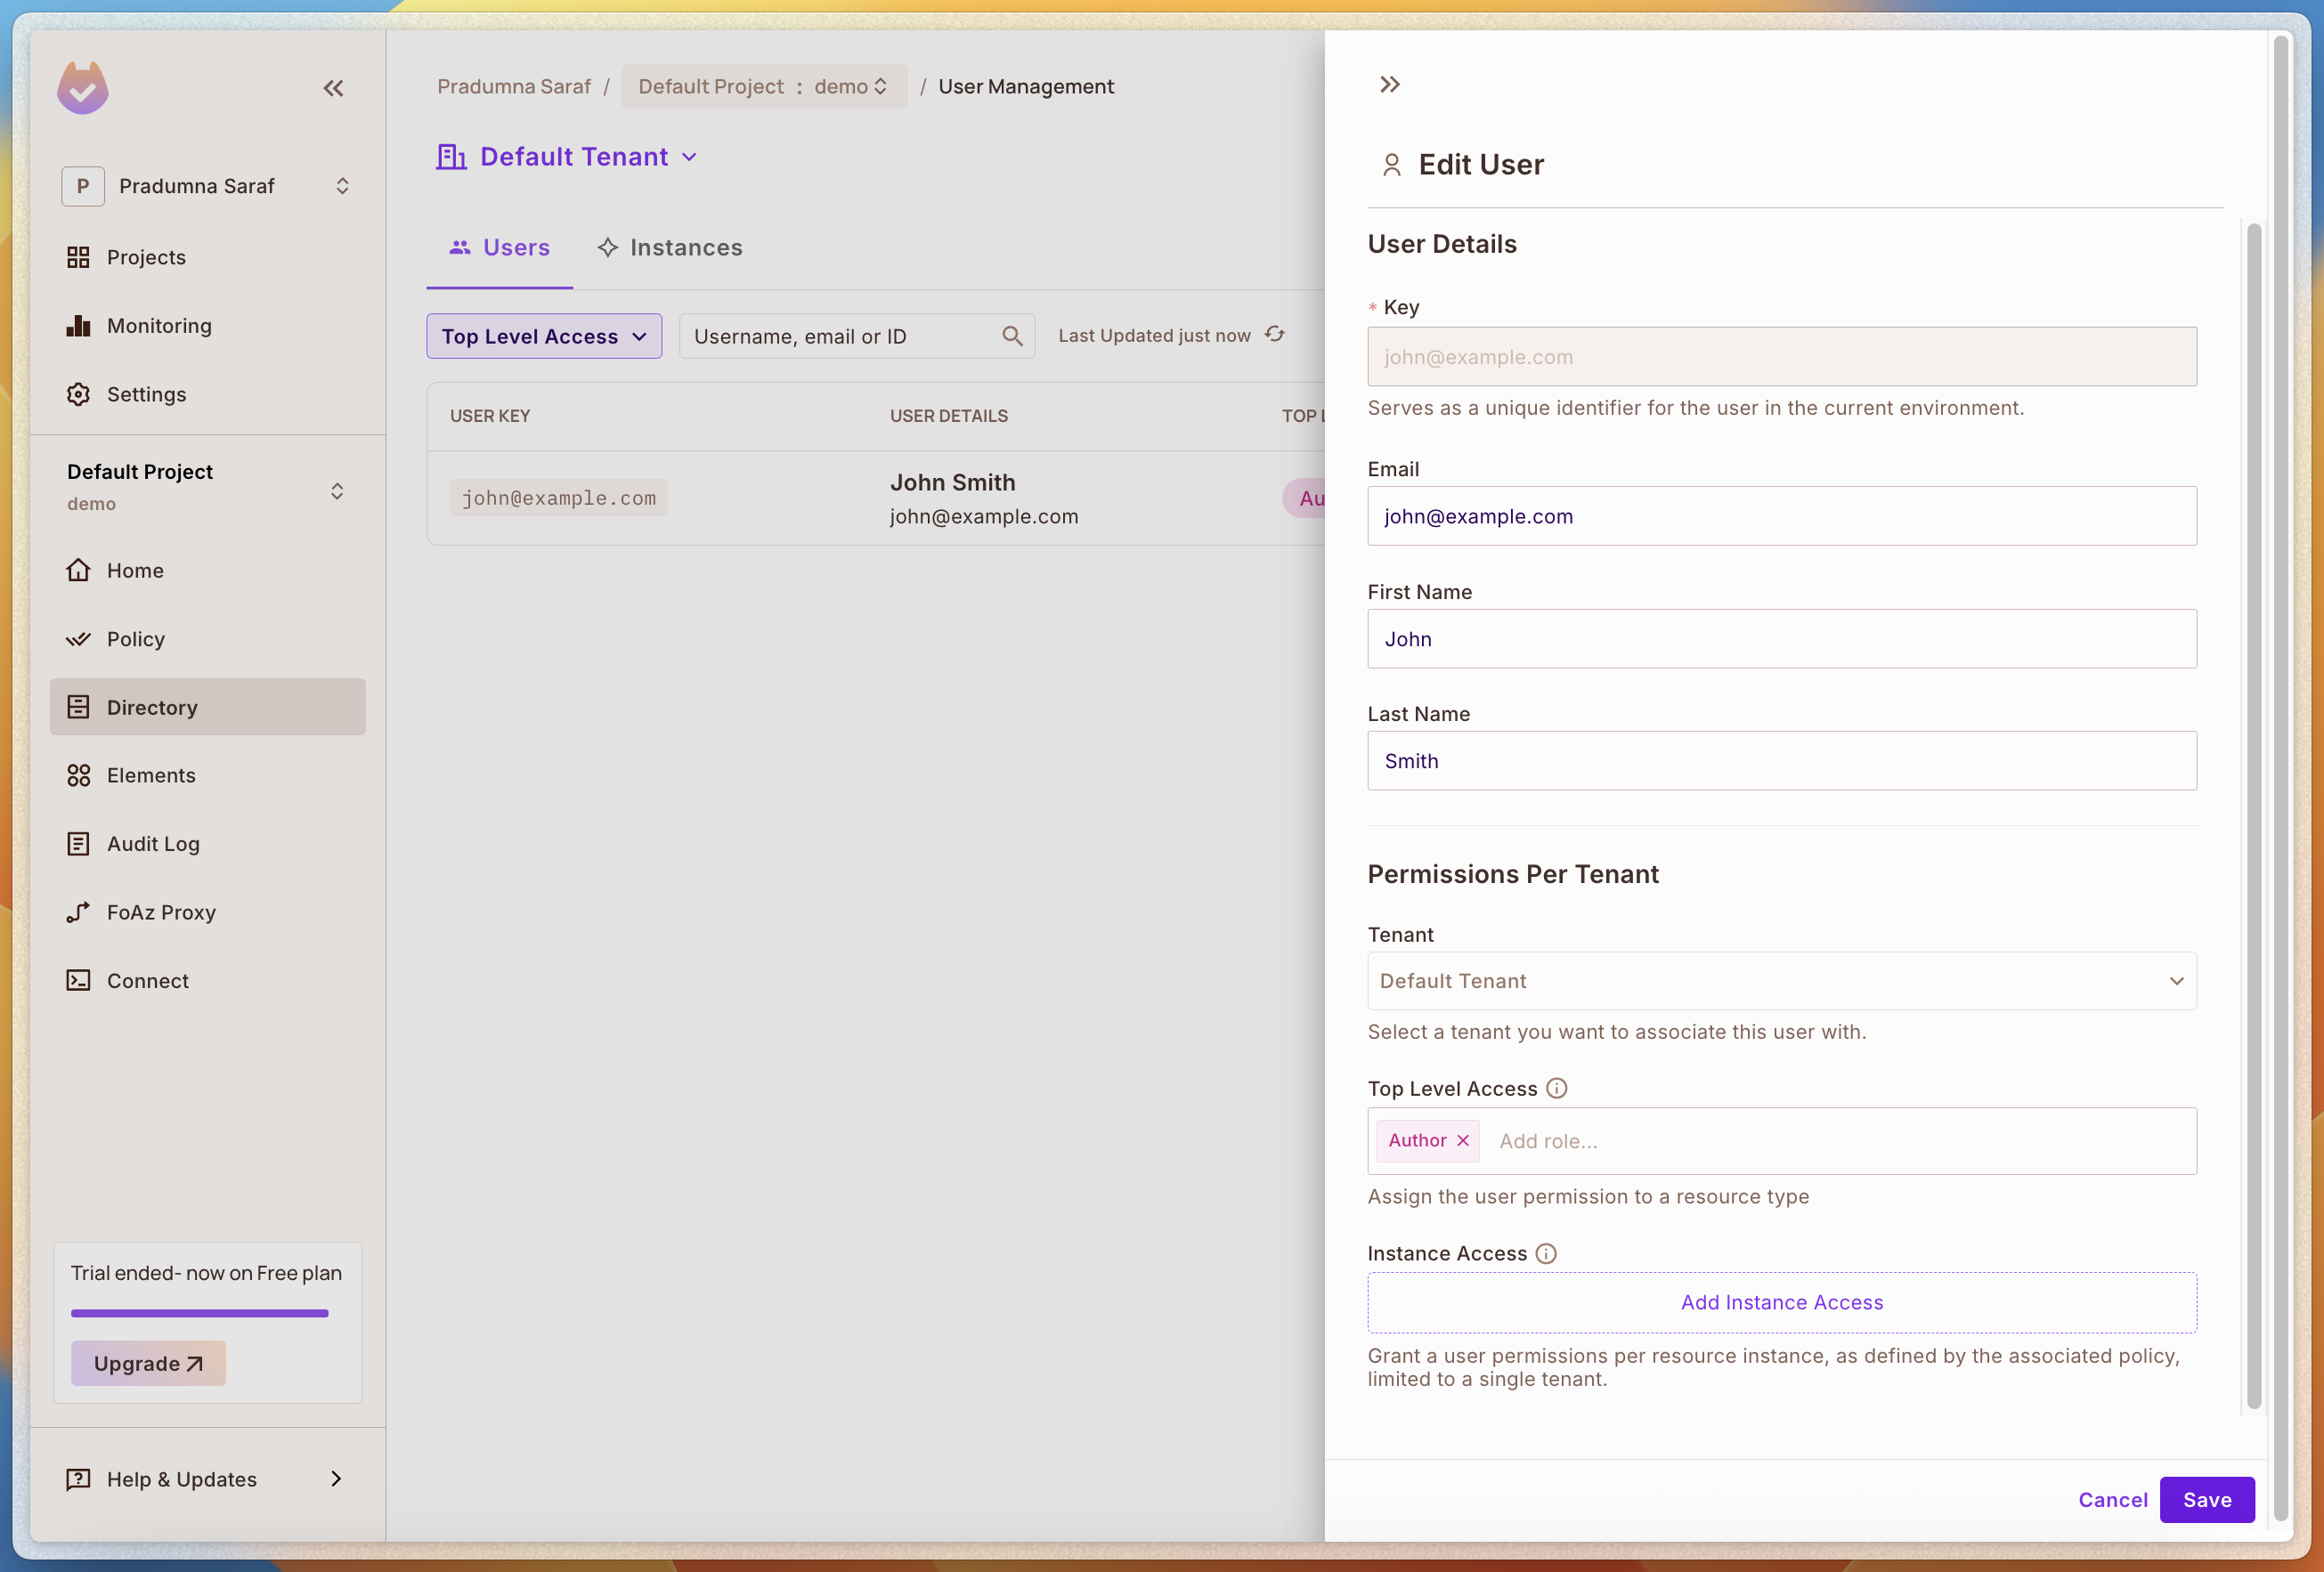
Let's now head over to the Permit dashboard and check if the user is created successfully. To do that, select Directory from the left sidebar, and we can see the user we just created. Let's give this user access to the resource we created in the policy. To do that, select the user we just created. Then click on the Add Role button, select Tenant, and then select the Viewer role and save it. This will give the user access to the Visit resource we created in the policy. We will verify this later when we check the access. Also, we can give the access programmatically, it was a demo to show how easy it is to add access using the dashboard.
We can also add more roles and resources as per our needs. Now, let's set up the PDP server and check the access.
Checking the access
Now, let's check the policy enforcement. As we have added the user to the Viewer role, we can check if the user has access to the resource. To do that, we will use the curl command to make a request to the /api/protected/secret route we created earlier.
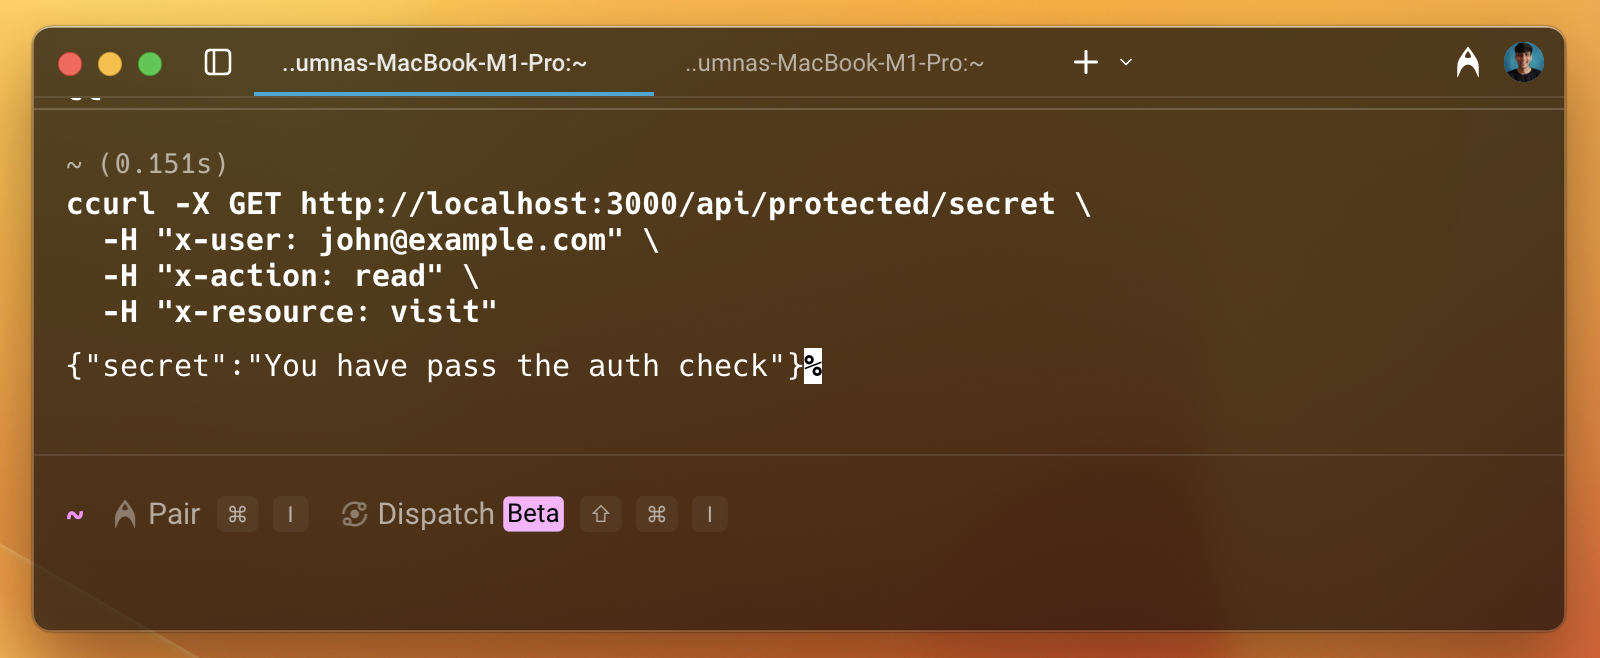
As we can see in the image above, the user is permitted to access the resource. Let's remove the access from the dashboard and check again.
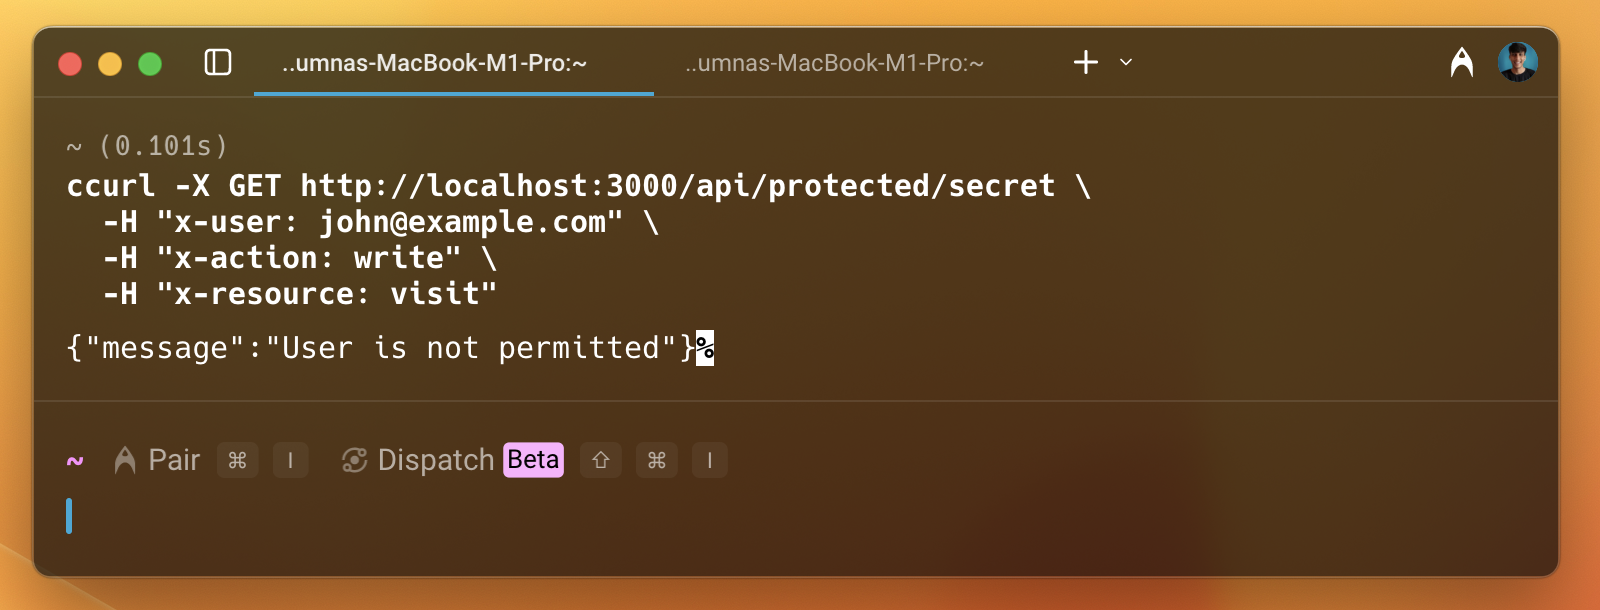
Now, this time, we can see that the user is not permitted to access the resource. This is how we can enforce policies using Permit.io with ASP.NET.
Conclusion
In this guide, we have seen how to integrate Permit.io with ASP.NET. We have created a new policy with a template using the Permit CLI. Then we have integrated the Permit SDK with our ASP.NET application. We have also set up the PDP server locally using Docker.